
# Dualboot com o Linux
# Método A: OpenLinuxBoot
O OpenCore agora inclui o driver OpenLinuxBoot.efi que deve tornar o dualboot com Linux uma tarefa mais fácil.
Os passos para usá-lo são:
- Instale o Linux normalmente, isto é, iniciando uma
.isogravada em um pendrive. OOpenLinuxBoot.efinão está envolvido nesse estágio. - Adicione o
OpenLinuxBoot.efie oext4_x64.efinaconfig.plist, na seçãoDrivers. - Certifique-se de que a opção
RequestBootVarRoutinge a opçãoLauncherOptionestão ativadas naconfig.plist. Também é recomendado ativar a opçãoHideAuxiliaryde forma a ocultar kernel (kernéis?) Linux antigos. Para reexibi-los, basta apertar a tecla ESPAÇO para exibir as entradas auxiliares no menu do OpenCore. - Reinicie para o OpenCore e o Linux instalado deve aparecer.
- Nunca mais use o GRUB.
Caso já tenha usado os métodos B ou C abaixo, será preciso remover as configurações para que as distribuições Linux não apareçam duas vezes no menu do OpenCore.
Para mais informações sobre como o OpenLinuxBoot funciona e orientações adicionais de solução de problemas, veja a seção do OpenLinuxBoot no documento Configuration.pdf do OpenCore.
# Método B: Encadeando um bootloader EFI (GRUB2, Systemd-boot)
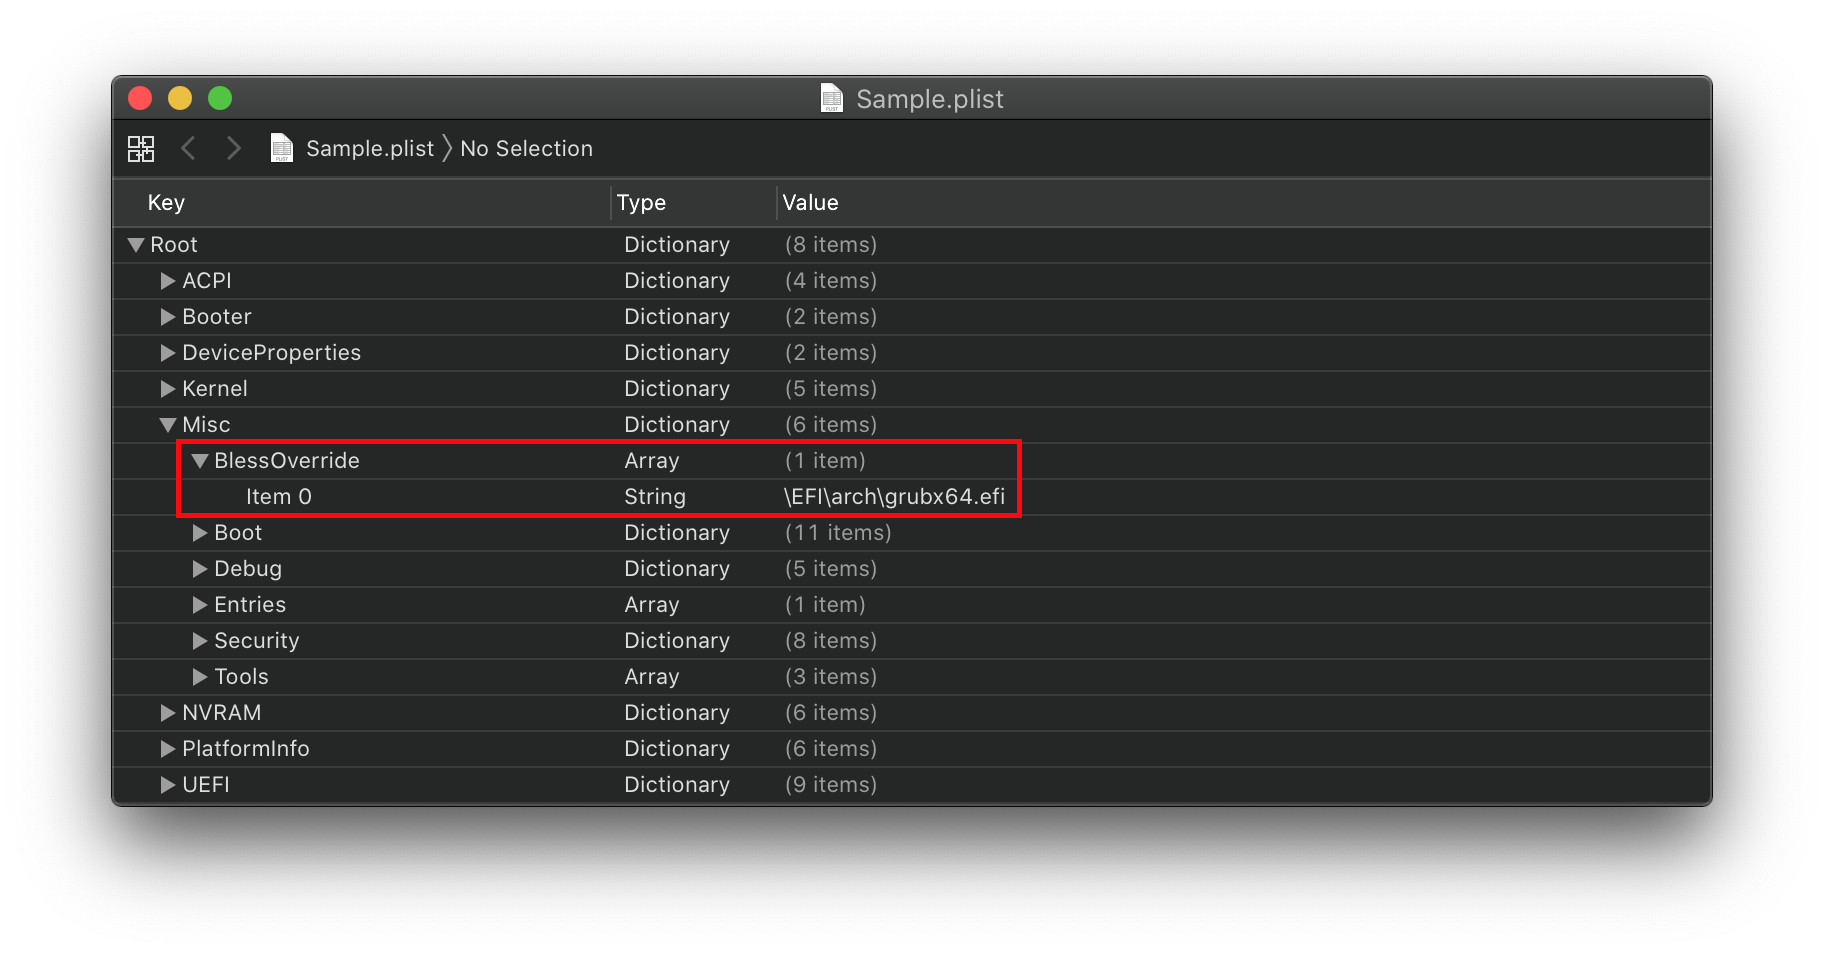
# Método 1: Usando o BlessOverride
Se o Linux não for encontrado automagicamente, adicione as seguintes opções na sua config.plist:
Misc -> BlessOverride -> \EFI\arch\grubx64.efi
Alguns caminhos comuns para bootloaders de Linux:
\EFI\arch\grubx64.efi\EFI\ubuntu\grubx64.efi\EFI\systemd\systemd\systemd-bootx64.efi- Veja a sua distribuição ¯\_(ツ)_/¯.
# Método 2: Usando o efibootmgr (recomendado)
O efibootmgr é um programa que manipula o Gerenciador de Inicialização da EFI presente no firmware UEFI do computador. Com ele, você pode criar novas entradas e adicionar o gerenciador de inicialização do Linux (GRUB2, systemd-boot, entre outros) de forma que ele aparecerá no OpenCore, poderá ser selecionado e colocado como a opção padrão no OpenCore (use Ctrl + Enter na opção selecionada). Para usá-lo:
Saiba qual bootloader/gerenciador de inicialização você está usando (GRUB2 ou systemd-boot ou qualquer outra coisa).
Inicie o Linux pelo OpenCore. Você vai precisar usar o Shell UEFI para executar o aplicativo EFI referente ao bootloader/gerenciador de inicialização.
Encontre o caminho do seu bootloader/gerenciador de inicialização, que geralmente fica na EFI (se você configurou corretamente).
No Terminal dentro da sua instalação Linux, execute
lsblk(disponível na maioria das distribuições):$ lsblk NAME MAJ:MIN RM SIZE RO TYPE MOUNTPOINT ... sda 8:0 0 223.6G 0 disk ├─sda1 8:1 0 200M 0 part /boot/efi ├─sda2 8:2 0 116.3G 0 part └─sda3 8:3 0 107G 0 part / ...- Verifique a seção de ponto de montagem para descobrir em qual partição está a raíz
/do sistema (no exemplo,sda3). - O caminho
/boot/efipossui a minha partição EFI montada (caso você tenha adicionado-a corretamente aofstab, o que deveria). - O bootloader/gerenciador de inicialização está no caminho
/boot/efi. - O número de partição da
/boot/efié1nesse caso (pode sersda1ounvme0nXp1ou qualquer outra coisa). Caso você tenha sua EFI em outra partição, por favor, anote o número.
- Verifique a seção de ponto de montagem para descobrir em qual partição está a raíz
Mude de diretório para onde a sua partição EFI está montada executando o comando
cd /caminho/da/efi(por exemplocd /boot/efi).Uma vez dentro, geralmente haverá uma pasta chamada
EFIque contémBOOTe outras pastas. Uma dessas pastas pode conter seu o binário EFI do seu bootloader/gerenciador de inicialização. Caminhos comuns são:EFI/arch/grubx64.efi- para Arch com grub2.EFI/ubuntu/grubx64.efi- para Ubuntu com grub2.EFI/systemd/systemd-bootx64.efi- para systemd-boot (caminho usado pelo Arch).EFI/fedora/grubx64.efi- para Fedora com grub2.- Ou execute
find . -iname "grubx64.efi"oufind . -iname "systemd-bootx64.efi"na sua pasta EFI (você pode alterar o nome do arquivo para qualquer coisa que esteja usando).
Anote:
- o caminho do binário.
- o número da partição que contém o binário.
- o caminho da unidade que contém o binário (
/dev/sdaou/dev/nvme0nX).
Instale o
efibootmgrna sua distro Linux (geralmente vem pré-instalado no Ubuntu, mas requer instalação manual no Arch, por exemplo).Uma vez instalado, execute sudoer/superuser (ou use sudo).
efibootmgr -c -L "Linux" -l "\EFI\caminhopara\arquivox64.efi" -d "/dev/sda" -p 1-c: Cria.-L "Linux": Nome da entrada de inicialização (você pode mudar para o que quiser).-l "\EFI\caminhopara\arquivox64.efi": Caminho do arquivo carregador. Precisa estar em um formato que o firmware UEFI possa usar, o que significa usar\(barra invertida) para separar os diretórios no caminho, em vez da/(barra) comum do Unix.-d "/dev/sda": Caminho da unidade, de forma que oefibootmgrsaiba em qual unidade o firmware UEFI possa procurar pelo arquivo. Pode ser/dev/nvme0nX(substitua X pelo número da unidade) caso esteja usando um SSD NVMe.-p 1: aponta o número de partição encontrado anteriormente. Caso a sua partição EFI seja a primeira na unidade, essa opção pode ser omitida.
Reinicie e verifique o OpenCore. Você verá uma nova entrada chamada
EFI. Pode haver vários, já que ele pode apontar para outras entradas de inicialização. Isso não é um bug, é uma feature do OpenCore.
Observação:
Isso pode ser usado para qualquer aplicativo EFI que você quiser adicionar ao Gerenciador de Inicialização do Firmware UEFI.
# Método C: Encadeando o Kernel (Precisa Suportar EFISTUB)
Alguns kernels (kérneis?) Linux são compilados com o EFISTUB ativado em sua configuração, o que os torna carregáveis pelo firmware EFI como se fossem aplicativos EFI padrão (legal, né?). Podemos usar esse recurso com o OpenCore e deixá-lo carregar o kernel como se fosse um aplicativo EFI, ao mesmo tempo em que passamos argumentos de inicialização e outras informações.
# 1. Identificando a partição raíz
Primeiro, é preciso determinar qual é a partição raiz e seu UUID/PARTUUID. Essa informação nos ajudará a indicar a partição raiz do kernel/sistema correta.
# 1. Seu kernel e raíz do sistema estão na mesma partição: (usando o Arch neste exemplo)
Numa janela do Terminal dentro da sua instalação Linux, execute
lsblk(disponível na maioria das distribuições).$ lsblk NAME MAJ:MIN RM SIZE RO TYPE MOUNTPOINT ... sda 8:0 0 223.6G 0 disk ├─sda1 8:1 0 200M 0 part /boot/efi ├─sda2 8:2 0 116.3G 0 part └─sda3 8:3 0 107G 0 part / ...- Procure pela seção de ponto de montagem para obter a partição
/raíz do sistema (aqui,sda3). /boot/efipossui a minha partição EFI montada (caso você tenha adicionado-a corretamente aofstab, o que deveria)- O kernel e o
initramfsestão armazenados na pasta/boot, que é parte da minha partição raíz principal do sistema.
- Procure pela seção de ponto de montagem para obter a partição
Agora precisamos descobrir o UUID/PARTUUID. Execute
blkid | grep -i <system_root_partition>, ex.:blkid | grep -i sda3(precisa ser executado como root).# blkid | grep -i sda3 /dev/sda3: UUID="3d4768d7-d33e-4f9f-a821-e80eba22ca62" BLOCK_SIZE="4096" TYPE="ext4" PARTUUID="a1073e53-c768-4ce5-89ad-b558669bdb89"- Retornará tanto o UUID, quanto o PARTUUID. Anote-os em algum lugar.
Explore
/boote liste os arquivos. Você deverá encontrar o kernel e o arquivoinitramfs.$ cd /boot $ ls -l total 51698 drwxr-xr-x 7 root root 34304 Jan 1 1970 efi drwxr-xr-x 6 root root 4096 Sep 18 19:42 grub -rw-r--r-- 1 root root 10144696 Sep 22 23:31 initramfs-linux.img -rw-r--r-- 1 root root 32047033 Sep 22 23:32 initramfs-linux-fallback.img -rw-r--r-- 1 root root 3161088 Jun 16 17:50 intel-ucode.img -rw-r--r-- 1 root root 7541344 Sep 22 23:31 vmlinuz-linux- Veja que meu kernel se chama
vmlinuz-linuxcom o arquivoinitramfs-linux.imgservindo como seuinitramfs. Ainda existe um arquivo.imgcomo substituto. Também há um arquivointel-ucode.imgpara a mitigação lixo da Intel.- Caso esteja usando AMD, poderá encontrar um arquivo
amd-ucode.img. - Algumas outras distribuições podem armazenar essas imagens em outro lugar. Verifique a sua distribuição para saber como ela lida com firmware de microcódigo da CPU.
- Caso esteja usando AMD, poderá encontrar um arquivo
- Veja que meu kernel se chama
Reinicie para o OpenCore e pressione Barra de Espaço. Mais opções devem aparecer. Uma delas deverá ser o
OpenShell.efi. Caso não apareça, baixe o arquivo.zipdo OpenCore, copie-o da pastaOC/Toolse adicione-o a suaconfig.plist. O ProperTree pode fazer isso usando a função de snapshots.
# 2. Your kernel is in your EFI partition
In case you're using systemd-boot, make sure you install the kernel in your EFI partition where systemd UEFI bootloader can detect and load your kernel: basically make sure it's in a FAT32 partition which your EFI partition should already be.
# 2. Identifying your UEFI paths and devices
In the shell
run
map -r -bto list all your devices (-b to break the scroll)BLKX:are all the partitions/disks scannedFSX:are all the explorable filesystemsPciRoot(0x0)/Pci(AxB,CxD)/SataorNvmeare your drives types (nvme or ahci)HD(X,GPT,<PARTUUID>,...)orHD(X,MBR)are your drive partitions whereXis a number, GPT/MBR the disk partition scheme then followed with PARTUUIDExample:
Mapping table FS0: Alias(s):HD0a0a1:;BLK1: PciRoot(0x0)/Pci(0x1F,0x2)/Sata(0x0,0x0,0x0)/HD(1,GPT,4C86153F-3A91-4328-878A-807A8FA944A1,0x28,0x64000) FS1: Alias(s):HD0a0a2:;BLK3: PciRoot(0x0)/Pci(0x1F,0x2)/Sata(0x0,0x0,0x0)/HD(2,GPT,B186A074-AE41-495C-BAF3-04AD655A73FB,0x64028,0xE8B0C90)/VenMedia(BE74FCF7-0B7C-49F3-9147-01F4042E6842,1D89CBABD1BB094B87762CDCDC3168F6) FS2: Alias(s):HD0a0a2:;BLK4: PciRoot(0x0)/Pci(0x1F,0x2)/Sata(0x0,0x0,0x0)/HD(2,GPT,B186A074-AE41-495C-BAF3-04AD655A73FB,0x64028,0xE8B0C90)/VenMedia(BE74FCF7-0B7C-49F3-9147-01F4042E6842,43B537EA89133A48A9640D5A373D2982) FS4: Alias(s):HD0a0a2:;BLK6: PciRoot(0x0)/Pci(0x1F,0x2)/Sata(0x0,0x0,0x0)/HD(2,GPT,B186A074-AE41-495C-BAF3-04AD655A73FB,0x64028,0xE8B0C90)/VenMedia(BE74FCF7-0B7C-49F3-9147-01F4042E6842,9FEEB42E4604B44BB4CB39A9D6F41DB8) FS5: Alias(s):HD0a0a2:;BLK7: PciRoot(0x0)/Pci(0x1F,0x2)/Sata(0x0,0x0,0x0)/HD(2,GPT,B186A074-AE41-495C-BAF3-04AD655A73FB,0x64028,0xE8B0C90)/VenMedia(BE74FCF7-0B7C-49F3-9147-01F4042E6842,EDB22B3A8A95AC4B9A66E4E287559689) FS6: Alias(s):HD0a0a2:;BLK8: PciRoot(0x0)/Pci(0x1F,0x2)/Sata(0x0,0x0,0x0)/HD(2,GPT,B186A074-AE41-495C-BAF3-04AD655A73FB,0x64028,0xE8B0C90)/VenMedia(BE74FCF7-0B7C-49F3-9147-01F4042E6842,FA8B4C241BA35347B093F2E560B563EA) FS3: Alias(s):HD0a0a2:;BLK5: PciRoot(0x0)/Pci(0x1F,0x2)/Sata(0x0,0x0,0x0)/HD(2,GPT,B186A074-AE41-495C-BAF3-04AD655A73FB,0x64028,0xE8B0C90)/VenMedia(BE74FCF7-0B7C-49F3-9147-01F4042E6842,93DFEA9BE3D44D4CBE5A8A4F978348D2) BLK0: Alias(s): PciRoot(0x0)/Pci(0x1F,0x2)/Sata(0x0,0x0,0x0) BLK2: Alias(s): PciRoot(0x0)/Pci(0x1F,0x2)/Sata(0x0,0x0,0x0)/HD(2,GPT,B186A074-AE41-495C-BAF3-04AD655A73FB,0x64028,0xE8B0C90) BLK9: Alias(s): PciRoot(0x0)/Pci(0x1F,0x2)/Sata(0x0,0x0,0x0)/HD(3,GPT,A1073E53-C768-4CE5-89AD-B558669BDB89,0xE914CB8,0xE8B0C90)BLK0seems to be the disk BLK as its path does not show any partition numbering or UUID- This is logical as the first thing your firmware will look for is the disk, not its partitions
- I have BLK1/BLK2/BLK9 which are my 3 main partitions
- Because I have APFS driver loaded from OpenCore, there are new BLK devices shown because of that and thus added more partitions, which are actually just APFS container partitions, those can be ignored
- The reason why they can be ignored is because you can see that they have the same PARTUUID, also we're not here for those partitions
- FS0 seems to be BLK1, which is my EFI partition which is also FAT32 formatted, where OC lives
- In a multi-disk setup, FS0: can be whatever the UEFI firmware detects first, it does not mean that OC is always in FS0, in these cases FS0: could point to a USB device or SATA device. Usually, most firmware will follow this setup to read/find partitions: USB > SATA > NVME, this is not a norm as some other firmware could do something else (it can also depend on the boot order setting).
- Check if your linux kernel is there (in case of systemdboot)
cd FSX:ls- Use your eyes and a brain cell
- Just make sure you're properly reading the partition location before doing any actions
- FS0/BLK2/BLK9 all live in a SATA drive (which is my main boot drive for this example device)
- This matches linux reading the device as
sdXand notnvmeXnX - In the case of a NVMe drive, you would be seeing
Nvmeinstead ofSata
- This matches linux reading the device as
- BLK9's PARTUUID matches my root filesystem
a1073e53-c768-4ce5-89ad-b558669bdb89- But remember that it's in capital letters!
- BLK1 and BLK2 have their explorable
FSX, which means the UEFI firmware can explore and read files from them, however BLK9 which is an ext4 partition isn't, this means the UEFI requires a suitable driver to load its contents.
Identify your EFI partition (in this example it's FS0:)
- run
map -r > FSX:\drives_map.txt- This will run
mapand save the output to FSX: in a file nameddrives_map.txt - Note that UEFI Firmware use Windows-style path slash
\not/
- This will run
- run
Reboot to macOS/Linux distribution with ProperTree in it
# 3. Adding the boot entry to OpenCore's configuration file
In case:
- Your kernel is in the system partition:
- Download a suitable UEFI driver for your filesystem in use:
- Download rEFInd (opens new window)
- Extract the zip
- Explore the extracted zip > refind > drivers_x64
- You'll find these drivers:
- ext4
- ext2
- btrfs
- Pick the UEFI driver that you want and copy it to OC > Drivers
- Add it to your config.plist (you can use ProperTree > File > OC Snapshot)
- Download rEFInd (opens new window)
- Download a suitable UEFI driver for your filesystem in use:
- Your kernel is in your EFI partition (systemdboot), you don't need to set up any fs drivers
- Your kernel is in the system partition:
(Optional) In case you're using GRUB2, make sure you get a copy of
grub.cfgto get your kernel argumentsOpen config.plist in your plist editor (recommend ProperTree), under Misc > Entries, make a new child with type
Dictionary:Key Type Value Notes Comment String Whatever you want to write here, it's just a comment I guess lol - Enabled Boolean True/ON/1- Name String Name of the OS you want Can be anything you want Path String Template:
PciRoot(your_ids)/Pci(your_ids)/.../Type(your_ids)/HD(X,SCH,PARTUUID,stuff,from_map)/\path\to\kernel
Example:
PciRoot(0x0)/Pci(0x1D,0x0)/Pci(0x0,0x0)/NVMe(0x1,9B-64-50-F1-5C-38-25-00)/HD(6,GPT,608DA4F8-DA9E-4792-829F-A4CF4E5B8B82,0x2C431800,0x3B10800)/\boot\vmlinuz-linuxcheck below Arguments String Template:
initrd=\path\to\rd.img\if\used other_kernel_arguments
Example:
initrd=\boot\intel_ucode.img initrd=\boot\initramfs-linux.img root=PARTUUID=608da4f8-da9e-4792-829f-a4cf4e5b8b82 ro quiet intel_iommu=on iommu=ptcheck below Auxiliary Boolean False/NO/0- False: Always shown
- True: Hidden until you press space
- Requires Misc\Boot\HideAuxiliary=True if this is set to True- Path Notes:
- your_ids: from the map text file
- Type: NVMe/SATA
- X: partition number
- SCH: disk scheme (GPT/MBR)
- PARTUUID
- stuff,from_map: get them from the map
- \path\to\kernel: it's the path to the kernel binary
- TL;DR: Copy the path of the partition from the map text file.
- Note1: use backslash
\for kernel path, that's how UEFI firmware handles file paths - Note2: use regular slash
/for the PciRoot path, like shown in the example and template
- Note1: use backslash
- Arguments Notes:
- You can add as much
initrd=as you want (if you're using linux, you should know why and how) - Your other arguments are the same as in any other bootloader, you can add/remove/modify in the config directly
- You can add as much
- Path Notes:
Notes
- You can use the same scheme as above to add other efi files or uefi-loadable files (like systemdboot efi, Windows bootmgfw.efi...)
- You will NOT be able to set it as the default boot option with Ctrl+Enter, so you'll have to select it each time you want to boot it